I decided to make a major change–I moved this blog and all of it’s content to my website, www.speedbreeze.com. Why? It’s because the ToughBot project is becoming dated and doesn’t really fit with the projects that I have started and will release during 2008.
Posted by: jawilde | January 27, 2008
We’ve Moved!
Posted in Uncategorized
Posted by: jawilde | August 9, 2007
CSSF Student Portraits Released
The CSSF people just released the student portraits that they took during the registration process. You can see them in on the CSSF website.
Posted in Competitions, Photography, Post CSSF, Science, Science Fair
Posted by: jawilde | August 4, 2007
Flash Photography is Overrated (Part 1)
In a world filled with easy-to-use, point-and-shoot cameras, you’d expect that most people would be able to take really good photos. However, the truth is that most of the photos that people take aren’t really all that great. Photos often turn out with an under-exposed background and an over-exposed foreground. This looks absolutely horrible.
The cameras that take these photos aren’t to blame for these miserable photos; the real problem is that many consumers misuse their cameras.
A large number of people use the flash in their cameras for almost everything. Many people think that the more you use the flash on a camera, the better photos come out.
However, this is usually not true. Most of the time the flash in point-and-shoot cameras ruins photos. Why does this happen? It is because of the way in which the flash in a camera works.
In a normal digital camera, when a user takes a photo, a CCD, or charged coupled device, is exposed to light for a set period of time. The CCD turns the light into an electrical signal which is then recorded and saved on a memory card.
When a user takes a flash photo, the exposure or shutter time is reduced (making the photo darker) and a strobe light on the front of a camera flashes. Because of the small size of the strobe light, most point-and-shoot cameras are not able to effectively illuminate the background; they are really only good at illuminating the foreground. Since there is such a large difference in the illumination between the foreground and background, flash photos taken on point-and-shoot cameras turn out horriblely.
In order to make flash photos look nice, you have to have a much more powerful light source that can illuminate the foreground and the background. This is the reason why professional photographers use powerful lights when they are taking photos.
I hope that you have enjoyed this post. In the future, I plan to talk about alternatives to flash photography, how to use them, and other photography related topics.
Posted in Flash, Photography, Technology
Posted by: jawilde | July 29, 2007
A Comparison of Blogging Tools: Word 2007 vs. Windows Live Writer
A while back, I talked about putting together a comparison of the blogging features in Windows Live Writer and Word 2007. Well, here it is!
Comparison #1: Price
Word 2007
Word 2007 comes as a component of Microsoft Office 2007. Office 2007 costs $150 minimum (Home and Student Edition).
Windows Live Writer
Windows Live Writer is 100% FREE, no strings attached.
The Verdict
Windows Live Writer is better–it costs nothing and is thus less restrictive for bloggers with smaller budgets.
Comparison #2: Supported Blogging Websites
Word 2007
It supports Windows Live Spaces, Microsoft Windows SharePoint Services, WordPress, Blogger, TypePad, and Community Server.
Windows Live Writer
It supports Windows Live Spaces, Microsoft Windows SharePoint Services, WordPress, Blogger, LiveJournal, TypePad, Moveable Type, and Community Server.
The Verdict
The two clients are pretty equal here, the only difference is that Word 2007 does not appear to support Moveable Type.
Comparison #3: Post Editing
Word 2007
Posts are shown in Word’s “web view”. This doesn’t show what posts will look like after they have been posted to your blog.
Windows Live Writer
Posts are shown as they will look when they are posted to your blog This feature seems to work extremely well and is extraordinarily helpful.
The Verdict
I have found the Windows Live Writer feature that allows you to see your posts as they will look when they are posted to your blog to be very, very helpful. In Windows Live Writer, you don’t have to guess what different styles of headers and other types of formatting will look like on your blog.
Comparison #4: Ease of Use
Word 2007
Word 2007 features a completely new layout, featuring a new tab-based toolbar called the “Ribbon”. In my opinion, the layout is fairly intuitive; users of earlier versions of Word will probably find the new layout confusing, though.
Windows Live Writer
Windows Live Writer has, for the most part, a fairly intuitive interface. However, minor inconsistencies in the layout of features, especially in the image settings section of the sidebar, are a bit annoying. Most of these issues are not a big deal and will probably fixed in later beta releases of WLW.
The Verdict
The two blogging clients are pretty evenly matched. However, in my opinion, Word 2007 is slightly easier to use.
Comparison #5: Image Editing Capabilities
Word 2007
Word 2007 has a wide range of image editing capabilities, ranging from simple cropping tools an image filters to rotations and other 3-D effects. Word 2007 does not have a way to watermark photos.
Windows Live Writer
Windows Live Writer has some basic image editing tools and effects, such as sepia tone, color pop, black and white, etc. The coolest image editing capability in WLW is the “watermark” feature. It allows you to overlay text on to of an image to show that you made the photo. This is a very important feature.
The Verdict
Though many of the image editing features in Word 2007 were nice, I felt that the range of effects in WLW was sufficient for most blogging applications. I also felt that the “watermark” feature in WLW was extraordinarily important and that it was a major issue that Word did not have it.
Comparison #6: Integration with WordPress.com
Word 2007
Word 2007 has some basic posting, image upload, and editing features. It does not have any way to go to the dashboard or other WordPress.com specific page.
Windows Live Writer
Windows Live Writer has posting, image upload, and editing features. WLW has links to the dashboard, blog stats page, comments page, and friends surfer page on WordPress. It also, as I mentioned above, downloads and shows your blog’s theme during editing.
The Verdict
Windows Live Writer has far better integration with WordPress.com than Word 2007.
Comparison #7: Special Features
Word 2007
Word 2007 allows you to add SmartArt diagrams, Excel tables, Excel charts, add clip art, and add WordArt to your blog posts.
Windows Live Writer
Windows Live Writer allows you to add Windows Live Local maps (Microsoft’s competitor to Google Maps) to your blog posts. These maps can be shown in both a road-map style and a bird’s-eye-view style. WLW also shows, as I have mentioned twice before, your posts as they will look when they are posted to your blog. WLW can also split a post into multiple smaller posts.
The Verdict
There is no easy way to compare the special features for WLW and Word. The feature set for each of these applications is really geared towards different types of users.
Comparison #8: Support
Word 2007
Word 2007 has a few really nice instructional pages on the Microsoft Office website. You can also find information on various blogs and websites. I have also posted a few articles about on this blog about basic setup, image manipulation, SmartArt and Excel charts in Word.
Windows Live Writer
Windows Live Writer does not have as nice of online help pages as Word 2007; it has a relatively small help file on the Windows Live Website. If you can’t find information that you need there, you’ll have to search the Microsoft WLW blog or look at other blogs and websites. I have also posted a couple of articles on this blog about basic setup and image manipulation in WLW.
If you need extra functionality, you can look at the the Windows Live Gallery. There, you can find many free plugins for WLW and other Windows Live programs.
The Verdict
Windows Live Writer are pretty equally matched in this area. Word 2007 has more online help information than WLW. However, WLW has an array of free plugins and extensions.
Comparison #9: Best For…
Word 2007
Word 2007 is best for the occasional blogger who doesn’t want to use a web-based editor or download another program for blogging. Word 2007 is also good for those who need integration with other Office products, such as Excel.
Windows Live Writer
Windows Live Writer is best for the frequent blogger who wants to make use of all of the features that their blogging site has to offer, wants consumer-centric features, and wants to have some basic image manipulation capabilities.
Comparison #10: Overall
The Verdict
In my opinion, Windows Live Writer is the best option for most bloggers; WLW has some cool features, the ability to make full use of the features of blogging sites such as WordPress, and the ability to download free plugins to extend its capabilities.
Some bloggers may need integration with the rest of the Office 2007 programs. If this is the case, then use Word 2007.
Posted in Blogging, Live, Microsoft, Software, Technology, Website Update, Windows
Posted by: jawilde | July 29, 2007
Mechanical Design/CAD Tip: Make a Cheap Model First
When I was working on my science fair project,”ToughBot: The Pursuit of a Better Urban Search and Robot,” I designed all of my Lexan robot parts in a 2D CAD program called eMachineShop. Before cutting the Lexan parts out, I decided to make sure that the parts would fit together properly by making a cardboard model of the design.
To do this, I first printed out 1:1 scale copies of all of the parts and used scissors to cut them out. I then laid out the cutouts on to a spare sheet of 1/8″ cardboard.

Figure 1: The cutouts laid out on the sheet of cardboard.
After laying them out, I glued the cutouts to the cardboard with a glue stick. Then, I cut the individual components out of the cardboard sheet. Finally, I used regular Elmer’s glue to connect the components together.

Figure 2: The model before I glued the side pieces on.
By constructing a cardboard model, I found out that the sensors and batteries that I was planning to use wouldn’t fit inside of the frame. I was able to then tweak the layout of the sensors and choose a different type of battery.
Discovering these flaws before I cut the Lexan allowed me to save roughly $50. The materials required to make the model cost roughly $1-$2.
I hope that you find this tip helpful. I will be posting more of these in the future. Have fun designing electromechanical devices!
Posted by: jawilde | July 19, 2007
Even More CSSF Photos!
Today, the nice people at Synopsys Championship and at the California State Science Fair put up more CSSF-related media. The Synopsys Championship folks put up photos of their CSSF participants (including me) on their CSSF 2007 page. The people at the California State Science Fair put up a slideshow of pictures from CSSF 2007.
Stay tuned for more information about the results of CSSF 2007. More photos will be posted on the CSSF website in the coming weeks.
Posted in Post CSSF, Project Update, Science, Science Fair, Website Update
Posted by: jawilde | July 19, 2007
How to Use Image Effects in Windows Live Writer
In the past, I explained how to use image effects in Microsoft Word 2007. In today’s tutorial post, I am going to explain how to use the image effects built into Windows Live Writer, or WLW.
How to Add a Picture to a Blog Post
- Click the “Insert Picture…” link in the “Insert” section of the WLW sidebar.

- An “Insert Picture” dialog will pop up. Select the photo that you want to put in your post.
Basic Image Options and Effects
Under the Image tab in the sidebar, you can find several basic image settings:
- The layout section allows you to set the image’s margins and set how text is wrapped around it.
- The borders section of the sidebar contains pre-made borders for images. These include a drop-shadow style and a photo paper style (Note: these seem to only work in Windows Vista).
- The Link to section allows you to add a hyperlink to your image.
Under the Advanced tab in the sidebar, you can find tools to make basic tweaks to the look of images in your blog post:
- The tools in the image size section of the sidebar allow you tweak the size of the images in your blog posts.
- The tools in the image actions section of the sidebar allow you to change the contrast of the image and rotate the image.
- The text box in the other section of the sidebar allows you to set the text that will be displayed instead of the image in case the user shuts off images in their browser.
Advanced Image Effects
Under the Effects tab in the sidebar, you can find more advanced image effects. To add an image effect, click the + icon, and then select an effect from the menu. There are currently two types of image effects that you can use:
- Overlays are used to take one type of media and put it on to an image. Currently, WLW only supports putting text watermarks onto images.
- Transformations allow you to change the overall look of the image. Currently, there are several different types of transformations supported in WLW:
- Black and white
- Sepia tone
- Adjust temperature
- Color pop
- Sharpen
- Gaussian blur
- Emboss
My Thoughts
Overall, I was impressed by effects in WLW such as watermarking. However, I think that Word has a far wider range of image effects than WLW. I also think that the image tools are arranged in a far more less logical fashion in WLW than in Word. This makes WLW a bit confusing to use at first.
I wouldn’t worry about these minor issues. WLW is currently in beta; these issues will probably be sorted out in the near future.
I hope that users hoping to learn more about Windows Live Writer will find this post useful. Have fun blogging!
Posted in Blogging, Microsoft, Software, Technology
Posted by: jawilde | July 16, 2007
Getting Started with Windows Live Writer
After I read the post on the WordPress.com blog about Windows Live Writer, I decided to test out the program and post my thoughts on it. I plan to post a comparison of Office Word 2007 and Windows Live Writer and how good they are at blogging after I have finished testing Writer.
Note: Windows Live Writer is beta software. This means that the software is not technically done yet and is likely to change in the future. This also means that the software may be unstable or not work correctly in certain circumstances.
Installation
To download a copy of Windows Live Writer, go to the “Windows Live Writer Beta” page and click the orange “Download” button. Save the 5.5 MB file to your computer and then run it. A small window will appear in the bottom right corner of your computer monitor asking you to agree to the license agreement. Read the license agreement, and and if you like it, click the “Accept” button.

The installer will then prepare to install and give you a choice of whether to set MSN as your Internet Explorer homepage. Check the check box if you want MSN as your homepage. After you click next, Windows Live Writer will install. This should only take a minute or two.

Configuration
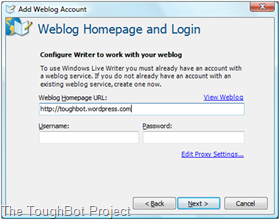
After the installer finishes, Windows Live Writer will open up. A window to add a blog account will automatically appear. It will prompt you to select a weblog type. If you plan to use WordPress.com, select “Another weblog service” as shown below and then click the “Next” button.

Now, type in your blog’s homepage web address and your WordPress.com username and password. If you want to double-check to see if you typed in the correct web address, click the “View Weblog” link. When you are done, click the “Next” button.
The program will now retrieve information about your blog. This should only take a minute or two. A new blog post will automatically open up.
First Thoughts
The interface looks really, really nice, and is, for the most part, fairly intuitive. There are just a few minor usability issues that I will explain in more detail in my comparison of Word and Writer.
I hope that this tutorial is helpful for those interested in finding out about using Windows Live Writer for blogging. I plan to post the same sorts of tutorials that I posted for Microsoft Word. Have fun blogging!
Posted by: jawilde | July 15, 2007
Surprise!
Today, I received a rather interesting letter. The return address on the envelope stated that it was from the “United States Senate.” What was inside the envelope?
I opened the envelope to find a short letter from Barbara Boxer, one of California’s two senators. In short, the letter was an acknowledgement of my participation in the 2007 California State Science Fair.
Posted in Science, Science Fair
Posted by: jawilde | July 13, 2007
New Header Image
I realized that my old header image did not communicate the result of my project, “ToughBot: The Pursuit of a Better Urban Search and Rescue Robot.” The old header image was also somewhat blurry. I decided today to switch the image out with a close-up picture of my robot. You can find the photo that the header image was made out of in the Media Gallery.
Posted in Website Update


